
Are you searching for an easy way to add box shadow in WordPress? In this post, we will share the simple steps you need to follow when adding a box shadow.
Learning how to add box shadows is important because it makes your important content stand out. This helps to grab the attention of your visitors.
If you have a one page website, consider adding box shadows. It will make your website design appear more engaging and interesting.
Why Add Box Shadows in WordPress?
A box shadow makes any onscreen elements stand out. They make content appear like an onscreen object is casting a shadow.
Your readers or website visitors will pay more attention to these sections because they appear closer to them. The content looks like it is hovering above the page.
We recommend adding box shadows to call to action buttons to make them appear physically closer to the visitors.
Before proceeding, it is important to note that we will use custom code snippets to make the changes. Therefore, you need some coding experience to implement this solution.
Let us get right into it.
Steps to Add Box Shadows in WordPress Using Code
It is advisable to add box shadows to the most important elements on your website. If you add shadows to all WordPress blocks, your site will look messy and confusing.
We recommend keeping your box shadows consistent across your entire WordPress website. You can achieve this by using plugins, but the best way to do this is by using CSS code snippets.
Here are the simple steps you need to follow:
- Log in to your WordPress website as an admin.
- The first step is to identify the CSS element you want to add as a box shadow.
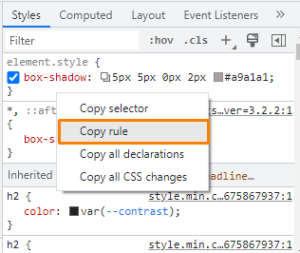
- Once you have identified the element, note the CSS class and add custom CSS and preview to see if you have the desired outcome:

- Right-click and copy the rule to paste it into the Additional CSS section of your WordPress website.
- To access the Additional CSS section, navigate to Appearance > Customize. Click on the Additional CSS link to add the CSS code to style the element.
box-shadow: 5px 5px 0px 2px #a9a1a1;
- This is the outcome:

- You can also add the following code to the Additional CSS section to add a box shadow to any WordPress block:
.shadow-effect {

box-shadow: 5px 5px 0px 2px #a9a1a1;

}
- Click on Block and scroll down to the Advanced
- In Additional CSS Class(es), type in shadow-effect.
How the Code Works
Before pasting the code snippet, it is advisable to replace the px values. It is important to ensure they match the kind of shadow you want to create.
Here are the different px values from left to right:
- Horizontal offset – Positive values will be pushed to the left, while negative values will be pushed to the right. If you do not want any change, simply put 0px instead.
- Vertical offset – Positive values are pushed down, while negative values are pushed upwards. You can type 0px if you do not want to offset the shadow vertically.
- Blur radius – This helps ensure the shadow does not have sharp edges. A higher value provides a greater blur effect. You can use 0px if you want sharper edges.
- Spread radius – This is how far the shadow will spread out. The higher the value, the greater the spread.
- Color – This is the color code or color name for the shadow.
Conclusion
By now, we are sure you can easily add box shadow to any WordPress block. As you have seen, it is not a very complicated process. All you need to do is identify the element and add the px values.
If you are having trouble adding box shadows to any WordPress block, add the code to the additional CSS section and use the class on any WordPress block to style it. You can also use a page builder or plugin to target specific elements.
We hope this post helped you learn more about adding box shadows in WordPress. You can contact us to help you out.